Thursday 23 December 2010

Tempus Fugit..........

Ok So I know the literal translation is time flees but stop being so picky!
I know its also been a week since my last update, I've been busy so I think you will forgive me.

On my last update I had just a bare chassis with front suspension in situ.
Since then I have undertaken the following,


Permently Rivet fuel line and brake lines.


Fit Steering Colum bearing.


Fit Steering Colum and extension shaft.


Fit Steering Rack.


Fit Engine


Fit Gear Box


Fit Prop


Fit Differntial.


Fit rear suspension and wishbones but not uprights as these have gone back to Saturn for modification.


Fit Radiator


Fit Headlamps


Trial fit scuttle and bulkhead with nose cone and bonnet, doing so I discovered that my poistion for the scuttle was to far rearwards and needed bringing forward otherwise my bonnet will be too short!


Brrrrrrrmmmmmmmm bbbbbbbbrrrrrrrrrrmmmmmmmmmm bbbbbbrrrrrrrrmmmmmm

Thursday 16 December 2010

What a difference a day (or five) makes......

Ok so its been five days since my last update, as well pretty much nothing has happened.

Well that's no entirely true,
The Diff has been painted and ratio identified as a 3.92.
The driveshafts have been reconditioned with new grease and new boots utilising steel boot clamps as opposed to cable ties.
The rear hubs have been painted and reconditioned with new bearings races and seal then treated to a coat of paint.


So tonight there was no reason to procrastinate any longer, a small tidy up of the workshop and in went the diff.


Following this I then refitted the fuel tank and started to site the facet pump deciding on using the diagonal brace for the tank support, two rivnuts and a couple of stainless M6 button heads later.


Of course this allows me to get a nice smooth bend on my fuel hose, I'm thinking of replacing the rubber bend with a copper one but i want to get some feedback from the lads on the haynes forum before I do.


Next was getting the fuel line up to the top of the diff i think the pictures show the route Ive taken well enough.


Being unsure of the IVA requirement for security of fuel and brake lines Ive secured them every 180MM using rubber lined stainless P clips and plan to use the same holes to run the brake line parallel in the same fashion.


Saturday 11 December 2010

Minor Update

So Saturday has been quiet so far, the sproglets and I took a jaunt down to see Alan at Premier wiring to collect my wiring loom. Not only did we come away with a top notch wiring loom we also purchased battery cables earth bond cable and rear fog and reverse lamps.

Once we got home i fired up the compressor and shot blasted the rear bearing carriers before giving them a couple of coats of primer. I'll let that set and then give them a couple of coats of top coat ready for the new bearings next week.

Ive also bent over one end of the Ali strip I'm going to be running down the transmission tunnel and into the engine bay and clamped it in place ready to start running the fuel and brake like down. I'm planning to do the same on the other side for the wiring loom.

Lets hope tomorrow brings a quiet day I want to have a tidy up again and move the parts racking into the other lock up and try to get the workbench to fit over the compressor to give me a worktop.

Friday 10 December 2010

Strapping.....

So thats both fuel tank straps completed, internal edges lined with foam backed tape, chassis lined with rubber, rear tank straps mounted via rivets to the chassis and the other sides secured via the riv nuts mentioned in the last post.


I then started to removed the remaining driveshaft from the rear diff, only to break another couple of TX40 bits, time to buy a propane torch and get some heat on them, as I want to get the diff mounted so I can run the fuel line and mount the pump.
today was semi productive on the kit car front, I got a gas bottle for the welder finally and collected a lightened flywheel to let the pinto rev easier.
Im hoping that the weekend will be quiet so that I can get the shot blasting done on the rear hubs ready to take them to a mates monday to get the new bearing races pressed in. and if i can get the drive shafts off new cv boots too!

Thursday 9 December 2010

Burn Baby Burn Garage Inferno.......


Ok So I've had a bit of luck for a change! I managed to pick up a non working large diesel space heater.
Got it home, repaired a broken wire, cleaned the shite out of the tank and cleaned the filter and ignition plug, unblocked the injector nozzle put it all back together an voila - a working heater for the workshop and for next to nothing!


So with this in place and a little help from a mate to lift the chassis back onto the tressells before carrying on to grind the welds clean and give them a nice coat of paint.


I then decided to work back forwards with regardst to getting the fuel system sorted, Ive glued rubber matting to the chassis where the tank sits to stop it rubbing.


Then I drilled and inserted 2 Rivnuts into the back of the chassis to hold the tank straps, im planning to rivet the back of them to the chassis.


whilst I was doing this my mate was helping out by reinstalling the pedal box and master cylinder along with the front brake lines (secured with clecos for now) I did notice that I need to cut a small "slot" into the clutch pedal to allow for fitment of the clutch cable without removing the soldered nipple.


Sunday 5 December 2010

Itchy & Scratchy!


Ok I know its been a month since I last wrote a blog entry a fair bit has happened which I will now endeavour to bring you up to date with.


I did managed to get the chassis painted as planned and it looked gorgeous! then I decided that I would start a trial fitting of the GRP.

Good plan, I discovered that the rear semi-circular plates needed to be removed.

Enter me with plasma cutter and 20 minutes later there off. From here things get a little awkward.
I start to weld up the various little nicks in the chassis where I cut the plates from and run out of
gas, not a major issue except i need to get a "proper" bottle to replace my helium bottle. this is still not done.

So I ended up borrowing my land lords welder, welding up what I needed to.

After fitting the rear end I decided to tackle the side panels, not to much of a task but one requiring me to constantly badger Andy @ Saturn sports cars, Thanks Andy!

So as I sit now the pair of side panels and the rear tub have been mock fitted along with the nose cone complete with radiator in situ. they have all been removed now for final "fettling" rounding off the corners etc.

the rear tub will of course require more mods including the holes for the suspension to come thru but i plan to do this when i finally fit it as i dont really want the weakened panel sitting about.
A little road trip this weekend took me down to see AshG and purchase a Megajolt from him. nice guy.
Then over to see Alan at premier wiring systems and placed an order for a full wiring loom.

A couple of peeks onto eBay has seen me the owner of a new set of alloys that clear my front brakes! and a set of caterham rear lights.

Enjoy the piccies.


Monday 1 November 2010

Metal splinters and Welding burns....

Been a while since the last update, I've had a few ups and down with the car over the last two weeks.


  • The weld nuts arrived and were duly welded to the harness mounts.

  • The head lamp brackets were welded on and then the dreaded re design of the rear roll bar braces.


Take a look at the two pics to see the difference, Original "Book" on left redesign on Right


just need to knock the rear suspension back on and plan the positions of the rear brake flexi pipe mounts and the fuel pump and regulator brakets before clearing out the workshop and sheeting it up ready for painting next weekend.

Monday 18 October 2010

"Insert clever sentence here"

So a little progress, I got the chassis stripped back down, I finished welding the rear frame work and the engine / gearbox mounts (Finally) I even cut a couple of pieces of steel and welded end plates on the open box section.

Then I welded the seat brackets in! Ya Finally!

I did however notice that i need to recon the rear uprights, having stripped one and shot blasted it i just need to pop it in my mates hot water parts washer to ensure all the grease is removed so no shot is hiding anywhere! but i think i will finish stripping the other one first !

Ive painted the new rear up rights in primer and primed and given the first top coat to the engine mounts.

Now I just need to figure out what I'm doing for the modifications to the rear stays on the roll bar and get the bosses for the harness welded in and also need to get some "Weld nuts" so I can weld the harness mounts in.

so some progress but not a lot!

Wednesday 13 October 2010

Absence lends fondness to the heart, and distance lends enchantment to the eye!

So after a whole month of virtual inactivity on the roadster were off again!

Well some of it wasn't my fault as you the intrepid reader will no doubt recall I was whisked away on a big metal bird to somewhere hot sunny and with cheap beer for two weeks! then back to the real world of work and responsibility so the car had to stay as she was for another two weeks.

However last night I managed to work up not only time but enthusiasm to work on her! I finished the welding I had started and dropped the chassis back on its wheels to carry on with the welding of the mounts.

Rather than tip it up on the other side and allow diff oil to run from the breather I decided that I will do that last bit of welding on that side of the chassis when I remove the Diff again (later this week hopefully) as I have decided to replace the CV boots and paint the drive shafts as they look a little rough.

I did however carry on with the seat mounts, I now have one set ready to weld in on the drivers side, I just need to wire brush some paint off the chassis to ensure a good weld and away I go with that! I am however still in 2 minds about the passenger seat as it has no adjustment runner, I'm unsure if I should fit one or not.


On a lighter note my headlights have arrived from Rally design, A mate of mine had ordered a plumbed in fire extinguisher for his 4X4 "Tonka" toy from them so I just tagged my order on with his and we split the P&P to save a couple of quid each.

Oh and thanks again to the guys @ Saturn Sports Cars I received my replacement rear uprights today Spot on thanks Guys!

After reading through the Haynes forum I came across a good idea one of the lads had concocted of using nail varnish to mark a finished nut/bolt combination, so a visible check is fast and fastidious, I loved the idea as the tippex Ive always used can be hard to see so Ive got some "Slut Red" nail varnish as my mate calls it, should be nice and see able.

So plenty of parts to fit and not a lot of time to do it, I'm sat at home feeling like shite at the moment with a chest infection so I cant really go and spend a cold day in the workshop if i felt well enough to do that Id be at work!

Lets hope I feel better tomorrow so I can crack on again.

Monday 13 September 2010

So fantasy gives way to reality.

Monday again, nothing done all weekend on the car due to the kids the weather and feeling like death warmed only ever so slightly.

So back to work today and a shock to the system that was! up at 03:30 and down to work on a refinery for the best part of the day, hot sticky uncomfortable work.

even so the day ended at a reasonable time and I even managed to get home at a reasonable time.

Planning to get on with the kit this evening was fruitless, first off the Mondeo had a flat tyre and a dent in the wheel rim, im hoping that the flat tyre was down to the dent in the rim seeping air.

so after a gentle realignment using the magic stick (IE copper mallet and drift) i pumped the tyre up and tomorrow will tell.

whilst moving the car i noticed the rear brakes didnt sound to good, so more inspection and eh voila rear brakes are worn out.

luckily being a clever cat I was prepared for this having brought new rear discs and pads when i replaced the fronts a month or so ago (ok im lazy not fitting them all at once)

so tonights kit time went on the mondeo, after all I cant have it breaking down on the way to gatwick airport friday!

cant wait to get on that big metal bird and fly off to the sun for 2 weeks!

Friday 10 September 2010

So on the seventh day......... bugger its only friday - CUT

So today has been a total wipe out of a day it took me over an hour to get going when I finally woke at 13:30, I hate this being ill lark, Ive done nothing but sleep! so I ventured to Sainsburys for provisions again Ie more pain killers more lemsip and a bottle of brandy, I will kill this cold this weekend.

Got home to find the Caterham headlamps I won on ebay in a drunken bidding frenzy and paid far to much for are infact useless to me, ah well.

Back to work monday I feel bad about having been off for 3 days as it is, cant risk not getting better as im off on the big metal bird in 7 days.

Still no welding wire and my patience is wearing thin, I wanted the chassis at the powder coaters whilst Im away , thats definately not going to happen now.

Ah well at least if tomorrows nice me and the kids can just chillax

Thursday 9 September 2010

Soft Kitty,Warm Kitty, Little Ball of Furr........


For those of you who don't get it watch the big bang theory.


So Ive not been to work for 2 days now with this cough its absolutely murder! every time i move sneeze cough etc all my chest muscles scream to be put out of their misery!


So what have I been doing, sleeping is what! lots of it.


I have gotten a few kit related things done, on a foray into St Neots (local big town) for some more cough medicine I dropped my prop into Baily morris to get it altered so that will be ready for collection Monday.


I also dropped my tank into an aluminum welding place on the same industrial estate to get that altered for a "drink" IE £10 later and as long as it took me to get to the chemist and back it was done and leak free!!!!


one last job accomplished was the purchase of a length of 10mm ID mild steel tube for making my new alternator bracket, not feeling adventurous I have done no "actual" work to the car but still feel that progress has been made.


I have the terrors ermm I mean kids this weekend so no chance for a rest up then or even much chance of getting work on the kit done, we might have a go at measuring up the brake pipes and sit in the warm like the cripple I feel.

Wednesday 8 September 2010

I should have KNOW better............


So I'm writing this from bed at 15:15 in the afternoon, "Why aren't you at work!" I hear you cry! steady now and I will explain all.


The answer to the above question is "Stupidity" IE Mine.


Let me elaborate for you, Monday came and went as Mondays have a habit of doing, nothing special about it other than taking a mate to Birmingham to collect his new car, In the rain and yes looking over it and getting soaked, OK so not clever but not enough stupidity to really explain the title other than no work getting done on the kit.


Tuesday comes along pretending to be a nice friendly day, I am lulled into a false sense of security by a nice early start for work almost ensures a good finish! and yes I'm home and working on the kit by 17:10 a small miracle!


so the new gearbox mounts are tacked on the engine and box removed and split with the flywheel and clutch being removed and the engine fitted to the stand, nothing hard here and no hard work thanks to my super duper roof mounted winch.


chassis is pushed outside and the floors swept, then blown over with the air line to get all the remaining swarf out and stop it burying itself in my knees on a daily basis!


so i decide hmmm cars outside why not chuck it up on its side and clean the engine mounts up without getting a face full of grinding sparks and hey its not windy so finish the welds whilst its there!


Nah, grinding goes fine, but the welder really doesn't want to play and i end up removing the 0.7KG roll of wire and slinging it so I'm welderless at the moment waiting for the 5KG roll and 0.8 tips I ordered yesterday to be delivered.


still noting to explain my stupidity, well avid reader read on and laugh as you may.....


So with the chassis back on its wheels and ready to push back into the lock up I decided to get the degreasing gun out! with some Gunk in it (neat of course) I fill the lock up with atomised degreaser thinking as soon as I have done it i should have worn a breathing mask, yes people I am sitting hear rattling and coughing like an 90 year old cigar tester who also worked as a coal miner for fun. so learn from my mistakes use a breathing mask if your using a degreaser gun!


oh it didn't stop me tho I washed all the degreaser off and used the air line to blow it clean.


so laugh while you may I'm going to sit here sounding like Mutley from the Wacky racers! I just hope I can breathe well enough to go back to work tomorrow.


Enjoy the pics

Monday 6 September 2010

Its too quiet something must be wrong........


Ok so I know it's been a few days without an update but I've had a few problems getting online.


so now for some news,


Radiator is fitted! Yay! and I've trimmed the nose cone down to fit i just need to take the sanding drum on the Dremel to the cut edge to smooth it off.


I've also trimmed the scuttle to fit too! And the front bulk head panel has been trimmed to suit the scuttle.


Oh and Ive brought some new seats, I just need to collect them. oh and a set of Caterham headlamps, I know I've always planned to use Rush headlamps but they aren't IVA OK apparently so I will use these for IVA and then fit the Rush lamps when these *break*


So plan of attack for the next time I get some car time,


  • Fit new brackets for gearbox


  • Drill and fit Rivnuts for nosecone and scuttle and make load spreading washers for where the bolt passes through the GRP.


  • Cut the head lamp brackets down to 120mm stalks and weld to chassis.


  • construct alternator bracket and pipe up coolant system.


I think that's the way to head, oh enjoy the pics!


Wednesday 1 September 2010

Radiation baby.......

Ok so today was a good day I managed to get home from work at a reasonable time and straight into the lock up!!!!

Ive been a naughty boy someone is going to have to spank me, with my holiday looming I took the decision that I NEEDED (that's a medical need) a second angle grinder, not because mine is dead, (well not yet) but because i spend forever changing from linishing disc to grinding discs, so £16 down B&Q (other DIY stores are available ;) ) however on my merry way to the check out I decided that checking the Dremels out was a good idea for when I come back from hols to start cutting my GRP.

Exit shop Carl - £130!!!! I brought a Dremel 4000 a pack of rubber clamps and the grinder. I'm a naughty boy.


Enough flirting! Today's progress was pleasing I arrived home to a nice big parcel containing my new rad !!! this meant I managed to weld all 4 rad brackets on !!! I also finished cleaning up 1 side of one engine mount bracket, lazy I know but I'm soon turning the chassis over and the rest will be easier to reach then!


Next plan is to tidy up again! place is looking like a sty and I'm having problems with the wire feed on my welder, that needs sorting before i throw it down the yard!

Tuesday 31 August 2010

Weld Grind, Weld, Grind, Weld, Grind I think you get the picture......

So I managed a little work on the bank holiday Monday, mainly cleaning and redoing welds I wasn't happy with.

I did tack the new engine mounts in (FINALLY) and cut the excess off with the plasma, my wisdom then took me to trying to seat out playing with the steering wheel, and well I nodded off, if it wasn't for the compressor kicking back in I could still be there!

no more work on the car tonight since I started work at 3am and have only just finished so no kit car tonight.

Saturday 28 August 2010

Teeny Tiny update

Yes I know its not even been an hour but i needed to share, or vent you choose, I brought the wrong faffin radiator! that's why it wont go low enough its too wide!

bastard thing!

Ive identified the right one now using several peoples build guides and am now going to wait calmly for the local motor factors to rip me off erm i mean open.

Every little helps.........

Small update, no new pics yet but wait until later .

so some small changes since the last update, Ive started to weld the strengthening plate in on the chassis rail, the top weld is complete and ready to be cleaning down i will finish the rest of it when i remove the engine and turn the chassis onto its back and at the same time i will finish the last of the welds on the rear tub section.

a trial fit of the radiator left me feeling dazed and confused and the bloody thing is still too high, time for a rethink methinks.

plans for today are to finalise the radiator mounts and possibly begin work on the alternator bracket.

I'll let you know later how i get on.

Wednesday 25 August 2010

A Lovely Rear End.......


So Monday was a bust for working on the car, but then being on call often means that's how it goes, Tuesday night I got home but still managed to get some work done on the car, I finished cleaning up the rear frame and tacked the new grp rear frame supports in place.
I was also planning to get some more done tonight and just as i was getting home I got called out to reading festival site, ah well theres hope for later in the week.

Sunday 22 August 2010

Monkey Burgers!


Right so Friday nights run from Thurliegh to Hartlepool was a great little drive and the mondeo excelled its self with only using 3/4 of a tank there and back!

so on arriving at Saturn I was greeted by Andy (Spud) and Adam, Handy was still Akip ;)


after coffee and chatting the talk turned to more serious matters, like "lets see how it came out then" referring to my bodywork and slightly abnormal choice of color.


Well as luck would happen it turned out Great! I'm well chuffed with it! ah then we come to loading the car up, but we prevailed and it did all all fitted! even if driving back the side panel was riding on my shoulder :)

Then after a monkey burger and a chin wag off back south!

unfortunately I was off out for a Curry with some mates last night so the burning desire to prop the GRP on the chassis and make Brmmmmmm noises had to wait, whats amazing is how much room its taking up to store it properly in the 2ND lock up!
Well this morning I tackled the removal of the rear tub with the angry grinder and then decided enough was enough time to pop the GRP on and take piccies!

my hope is that i will have finished my dry build before I go on holiday and then have the chassis off for acid bath and powder coat whilst im away along with a few bits to the chrome platers so once im home i can collect them and start the rebuild in earnest!


Enjoy the Pics and feel free to comment!

Thursday 19 August 2010

So a man walks into a bar........

Well you might think that last nights effort were a bit of a joke, I managed to spend 5 hours in the lock up last night! woo, I spent 3 of them with the angry grinder cleaning up the remains of the old engine mounts back to bare chassis beams. to discover that two beams had been damaged, one of them badly by the plasma cutter.
So, rather than filling the gaps with weld I've decided to plate them, this is all good and simple until yup you guessed it the welder runs out of wire! OK so this isn't a major issue I have a spare roll, oops the spare roll has gotten damp and now has more surface rust than a British Leyland build car! its beyond use. so that effectively halts progress for the evening. or does it, infinite wisdom ensues and the time is well spent reorganising my tools, making sockets back into sets (well close to sets) and sorting tools to go back in the van.

Well tonight after work I'm off to collect the fibre glass from the guys at Saturn, I gave you a sneak peek of it the other day with the photo that Andy sent me, once I get it home I might, that's might..... drop some of it on the chassis to give you a lookie at what she will look like once the body work is completed.

and yes girls, its a she. anything this awkward has to be female!

All work and no play........


So its been all work and no play so far this week, until last night that is!

my plans for Tuesday went out the window as I ended up stuck in Dover overnight for work.

Having made my way home Wednesday I proceeded to mount the new steering set up, finding it no better than the old set up (except every things now perfect not "near enough") I took the decision to cut all the engine mounts off and start from scratch again, 3 hours later I have an engine tack mounted but totally clear of the steering column! Yay!

I also took the time to finish my tidy up and now have a clean workshop! also having removed the fuel tank and rear roll bar from the car and put them in the other lock up for the time being.


the plan for tonight is to removed the excess material left from the old mounts that I didn't remove last night as I ran out of grinding discs and make some 5mm plates to weld to the chassis for the mounts to bolt on as I am unhappy with the current 3mm ones.


then I will cut off the gar box mounts and realign that making sure its dead center of the transmission tunnel before re welding them.


Then, and now I'm probably pushing my luck i might get the seat mounts and harness mounts welded in.


here's to dreaming!

Tuesday 17 August 2010

What do I have written on my forehead.....??

So last night I had planned to finish work for 5 and crack on with the steering rack mounts, erm no.....
Thanks to another engineer having some family problems I ended up heading to Reading at 4 o'clock to a generator that had Hemorrhaged 250L of fuel into the safety bund, so after draining this away and repairing the tiny piece of pipe that had split i started home to arrive in at, 830pm, bit late to be getting the angry grinder out. so I decided not to be beaten that I would carry on tidying up, which I did to some extent, well for about an hour before becoming bored and deciding i was gonna just call it a night.

Lets hope my plans for today go OK, I'm hoping to hit the Aluminum Warehouse today to collect a sheet of 2x1x1.5 Ali for making my transmission panels etc and also get home for the magic 5 o'clock and start on the steering, I really need to get this done this week before collecting the bodywork from Saturn on Saturday.

Wish me luck!

Sunday 15 August 2010

Open mouth insert foot

Ok so my plan for yesterday was to continue tidying the lockups and getting the tools sorted out so i was prepared for the arrival of the body work on saturday.
This didnt happen, Alfie decided that he wasnt content to sit in the kit and play with the steering wheel again today and that playing football with his brother was boring, so we ended up sat inside watching sponge bob and eating well basically shite all day! now I could have pulled Dad rank on them and made them come to the lock up but decided since I wont be seeing them for 2 weeks now I'd rather sit with them and just enjoy being with them.

On the plus side Sponge bob is kinda funny.

So Im about to start sorting tools to throw in the van for today and try to sort my sockets out as they are all intermingled now (thanks Alfie!)

Tonight I will try to get the steering tacked in! Im not pulling another week like the last one!

Saturday 14 August 2010

Daily Grind Part Deux

So with kids in tow I bravely headed to the lockup, having managed to amuse the kids with various running and fetching for me :) I have achieved most of what we set out to do, I managed to grind the welds clear on the chassis for the steering rack mounts. I also had a tidy up after removing the track rod ends from the old rack I decieded it was time to get the top box out of my van and get it back ontop of the roll cab, problem is empty the box weighs 40KG and its 41 inches long so kind of a strech to lift on your own, so after Recruiting Alex (LandLord) from his snooze on the sofa we put it back where it should be on the roll cabinet.

Now im jus sorting out what tools I need to keep in the van and whats going back in the workshop.

Place looks like a bomb has hit it again!

Oh well that will give me and my mini me's something to do tomorrow!

The Grind Continues


So having had a manic week at work I decided that this weekend would be a nice relaxing one, Yeah right, I have the boys this weekend again and its raining, meaning my plan of letting them kick a football about around the lockup has come to nought.


I have a couple of jobs I can do whilst the kids are about, I need to remove the Track rod ends from the old rack and extensions and clean up the chassis ready for the new laser cut brackets that arrived this morning from 3GE courtesy of John and as usual they are perfect.


I also have the engine stand i ordered from machine mart to build up ready for the permement Pinto that will be going in the car with the chrome and powder coated bits on it, ( I'm leaving the one thats curently fitted in for the moment until the shiny one is finished to give me something to build around.)


I've also decided conclusively on the wheel I will be buying for it once the build is about 95% complete Team Dynamics Pro Race 3 in white with some "Custom Detail"


So Time to force the kids out of there Pjs away from the TV and into some clothes!


Sunday 8 August 2010

So not much in the way of an update this weekend, Me and the sprogs are about to head into the workshop to have a good long tidy up as everythings all over the place and I have 2 pinto engines arriving next week / week after and my fibre glass is coming week of the 21st

best crack on!

Friday 6 August 2010

Ok so two posts in one day

Well this is a first, after my revelation this morning I decided that the reason I'm not happy with the progress on the kit is mainly the finish, so how to rectify this? well my conclusion is I'm going to finish the welding on the chassis, IE rectify the steering problems and complete the remaining brackets for the engines ancillary systems IE rad mounts, nose cone mounts, then exhaust braking etc etc well i reckon you get the idea, then strip down and off to the powder coaters for a decent finish. then rebuild the rolling chassis before off to the local garage to get the tracking and wheel alignments set before covering the track rod ends with the IVA proof gear.

Ive also decided to remove the 2 litre pinto that's currently fitted in order to strip it and check it over, I do have a 1800 pinto i can drop in so as to make sure that all the pipes brackets etc etc are in the right place.

I'm also planning to "pretty it up" chroming and powder coating various odds and sods and stainless bolts.

I feel like I'm having a ramble here so I'm gonna leg it and see what the kids are destroying

Thursday 5 August 2010

Eureka!

OK so its been a while again but I haven't been totally slack! works been crazy busy so build time has tumbled to weekends and as I have my 2 boys (Liam 5 Alfie almost 3) as often as I can this prevents a great deal of work on the car at weekends. Kinda hard to weld or grind with a couple of super inquisitive sprogs tagging along :)
But back to my excuses about not making any progress with the kit, I've managed to secure the use of a 2ND shipping container which has been put down about 15 feet from the existing one making my storage double what it was! so I've been busy fitting lights and power etc to that and testing my two new toys; a brand new plasma cutter from http://www.thewelderswarehouse.com/Welding/SWP_Cut_40_Plasma_Cutter.html
Great bit of kit I cant recommend them enough the guys there are very helpful and the service is top notch.

the second new toy is a DC tig welder, now I've never tig welded before and have spent a while trying (3 hours or so) now since its on disposable argon cylinders (which only last for 1 1/2 hours a pop) Ive used up 4 tungsten's and 2 gas bottles trying to teach myself so i think I'm going to pop it up for sale on locost builders then try eBay if not.


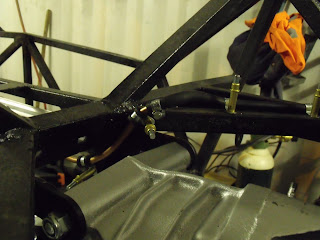
Ok so the Eureka is all down to my finally figuring out the problem with the steering, part of the reason was I couldn't see the wood for the trees so to speak, the steering rack mount is back to front meaning the rack is too low making the angle too steep for the column extension, OK so that's problem one, problem 2 is that my steering rack extensions have been made to book spec (Brought from 3GE) this means that they are about 70mm too long! this means that the left and right wheels are trying to steer in opposite directions at the same time! OK so that's problem two, problem 3 is the steering rack i was sold as a Mk II escort rack is wrong!


so on to the solutions, One, Order new plates for the steering rack mounts from 3GE to replace the u/s one, Two, ordered new extensions from Rally Design, and Three, New Steering rack from Rally design.

I've already checked that these parts will fit with the guys on the haynes forum so I'm feeling happier with it all now, I have to admit this steering issue has been getting to me and Ive been questioning myself a lot over if i should continue but haven't give in (although I've been close!)

So the progress for this update is small, the steel steering column bearing is in (with Clecos) and working well lets see what happens next week.


I'm going to try to post some new pictures etc with the next update when i fit the new rack.

Thursday 15 July 2010

So there hasn't been much of an update recently, thats because work is busy busy busy.

So since the last posting ive removed the steering colum bearing in favour of a proper metal bearing rather than the standard plastic sierra one, this will allow me to raise the steering colum a bit to help it clear the engine mount.

I went to fit the new steering rack clamps to find that the one for the pinion end wont fit Grrr its starting to look like my steering rack isnt the right one, so im trying to source one now, so that means i cant proceed with fitting the steering colum and extension until i get the replacment rack. so im going to have a go at the alternator mounting.

next jobs after the steering are rad mounts and seat mounts.

Wednesday 26 May 2010

Kit Car

First Post. 26/05/2010


Ok so Ive been building this car for a couple of years (!!!) now and have had a bit of bad luck with it, the original Zetec engine I was going to fit was supposedly a 1994, when the proof of age letter came back from ford its a 1997! so out that went, so I decided to go old skool, In goes a 2L Pinto (that's recently) of course just "dropping" a pinto into a chassis build around a Zetec isn't straight forward, for example the engines mount differently, and sit at diff rent positions in relation to the gear box so the gearbox mounts had to be moved and the prop shortened.


but its in now, however I'm still sorting the new mounts out, the first set foul the steering colum as does the V 1.0 alternator bracket, more on this next time.


so the cars taken some time to build to the stage its at now, rolling chassis minus the steering link, brakes partially done, seats sourced but not fitted, rear section needs to be redone in order to fit Saturn's GRP body work (http://www.saturnsportscars.co.uk/) and possibly the roll bar supports too.


still to fit are the seat mounts, headlamp mounts, wing stays, all ally panels (baring the floor) radiator and nose cone mounts. not much eh.


During the course of the build my marriage has also broken down this necessitated a break from the build of about 6 months where i had no access to the car until i finally got it moved.


However there have also been some ups, Ive found no end of support from the guys on (http://www.locostbuilders.co.uk/) and (http://www.haynes.co.uk/forums/index.php)


you might notice from the picture that im building in a shipping container, this is a great place to build but i could do with a 40 foot one as opposed to a 20 footer, as im running out of space for storage.


I'm hoping that writing this blog will help me gather steam as it were...